Category Archives: micro tutorial

JavaScript optimization. Optimizing IF statements.

IF statements in JavaScript and the normal world!

In fact every normal developer will try to make his code as readable as possible. In a normal world a JavaScript IF statement will look like so:

if ( expression ) myFunc();

where expression is something that can be either true or false and myFunc is just an example what can be called if the expression is true.

But that’s JavaScript?!

Yes, and just because is JavaScript every single character is important. Actually you can convert the row above with that one bellow:

expression && myFunc()

Than if expression is faulty myFunc() will not be called. That is really extreme and in the same time is quite clear to read.

Fancy tooltips with jQuery

I was decided to write this post from long time ago and now I’m pretty sure it has to be published. What I see in my practice and my browsing in the web there are too many old fashioned tooltips all over the web, as web developer don’t know how to make pretty good fancy tooltips.

That’s why I decided to show what’s not and what is fancy tooltip, with the help of jQuery. Of course don’t hesitate to make with every other library or pure JS code.

What is NOT fancy?

It’s not fancy when the tooltip is with fixed position. In the example here I made one pretty small sample:

What is fancy?

In the other side you can make the tooltip moving with the mouse pointer which is way better, as you can see here:

CSS sprites. Go beyond the limits with base64!

Why should I optimize CSS?

In fact how and why should I optimize CSS is the right question. Actually CSS is simply one ore more files loaded from the server to the client, usually a browser, with CSS specific rules that must be applied by the browser to the web page you’re seeing. That’s in general. Of course there are exceptions when CSS can be inline or added directly to the HTML tags, which is bad practice because thus the HTML markup becomes larger and even worse the browser cannot cache it and than load it quickly. In fact that’s why usually the CSS of a web page is put in one single file. Primary because that makes only one request to the server and in second hand because it can be cached by the browser.

Just because the nature of the CSS is that firstly it’s loaded and than executed one of the primary techniques of optimizing it is to make it smaller and therefore load faster. There are several methods of doing so. Enabling GZIP support of the web server and minifying the file are the most common ones. But one of the tricks you cannot optimizing just for second is using the so called CSS sprites.

CSS sprites

What are these? To answer this question I’ll simply try to give you an example. Let’s assume there are three CSS classes each one with its own background image. This makes four requests to the server. One for the CSS file and one per every background image. But what we’d like to achieve is to make less requests as we can. Than one of the things we can do is to make one single image and to change only the background-position CSS property to position it on the right place and to make it appear correctly.

Be careful! When you join all of the images into one single CSS sprite you may add one class with that background-image and every other class with only background-position property. Than every DOM element with that background must have both class names. Only than you can be sure the server will make two requests. One for the CSS file and one for the sprite.

base64 to encode images

In other hand most of the web projects are pretty big, and unfortunately it’s too difficult to make only one single sprite just because it’s too difficult to manage it after the project has become very large. That’s why mostly in the practice there are several sprites for the main components. But the problem is that again there are more HTTP requests.

Is there any way to make only one request?

Yes there is. Simply by converting your CSS sprite into a base64 encoded image. In breve base64 is an encoding where you can practically make any data into a string. Thus the image can be represented by a string containing the same information as the image. Hopefully most of the browser, except of course MSIE, does read the so called data urls, or:

<img src="data:image/png;base64,..... " />

and that’s enough to get started with base64 and the single request. The sprite has become a string!

CSS and base64

The natural question is now how to merge all this? You now have one CSS file with one or more sprites. Than you can convert them into a base64 encoded strings and put them all into the CSS.

There is a problem, of course, what happens with MSIE. As I said before MSIE doesn’t read base64 encoded images. Hopefully there is a solution described very well by Stoyan Stefanov in his blog post here.

Finally …

now there is only one request and everything works pretty fine. This technique can be really helpful to someone who’s trying to optimize the CSS performance to the limits.

CSS effective selector

CSS optimization

Recently I posted an article about CSS optimization describing five simple steps you can do to speed up the page load time and the bowser execution time. One of the key features is to use effective selectors, but what exactly that means.

Parents and children

In CSS, after the name of cascading, there is a very powerful feature of inheritance and you can simply describe a child style by a selector which can be something like that:

div table tr td a { color: red; }

In reality is very, but very inefficient. Event it is a working example, the browser will find every anchor <a tag within the page than check if it’s child of a td, than tr and so on until the closing outer most div tag.

That’s why the browser is really hard to find every one of these tags just to apply a simple font color. What the big problem is that once you have thousands of tags in that page the browser starts to use CPU and the application starts to be irresponsive.

The solution

Of course there’s a simple solution, which can be described as transformation from inefficient to efficient selectors. Because the browser can find a tag way faster by a given ID or CLASS you can simply convert the code above with something like:

a.my-class { color: red; }

and than change a bit the markup with a tags with that specific class name. Which is a bit tricky, but speedups the performance a lot.

How can I find bad selectors?

Actually that is the big problem. Once you’re into the deep of web development the applications are so big, with so many CSS selectors and so many CSS rules that you simply cannot track that any more.

Hopefully there comes some tools that can describe you everything and point you the inefficient selectors. My personal choice is the Google’s Page Speed plugin, which can be installed to the Firebug on Mozilla Firefox. It can analyze the page and extract a list of inefficient and so called very inefficient selectors that must be fixed!

Firebug’s console.profile vs console.time

Firebug’s console.time!

This post is directly related to the previous post where I explain how to use the Firebug’s console object and in that case its time method. That is really powerful and gives the opportunity to track the performance of a sample JavaScript chunk of code. What it does not do is to give you a more detailed profile of that particular JS code.

That’s because the console’s profile method works on functions and if you’d like to profile a loop it will give you there’s nothing to be profiled. One workaround to that is to use closures.

JavaScript closures

A JavaScript closure is to make an anonymous function and to put the code in it, like so:

(function() {
 for (var i = 100000; i--; ) {
  var a = new Array();
 }
})();

Firebug’s console.profile()

That code can be than wrapped with both console.profile() and console.profileEnd() in something like:

console.profile('my profile');
(function() {
 for ( var i = 100000; i--; ) {
  var a  = new Array();
 }
})();
console.profileEnd('my profile');

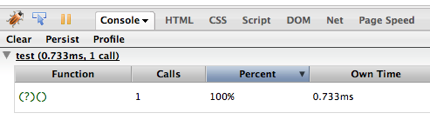
That will give a more precise measurement like that one shown on the picture bellow:

firebug console.profile